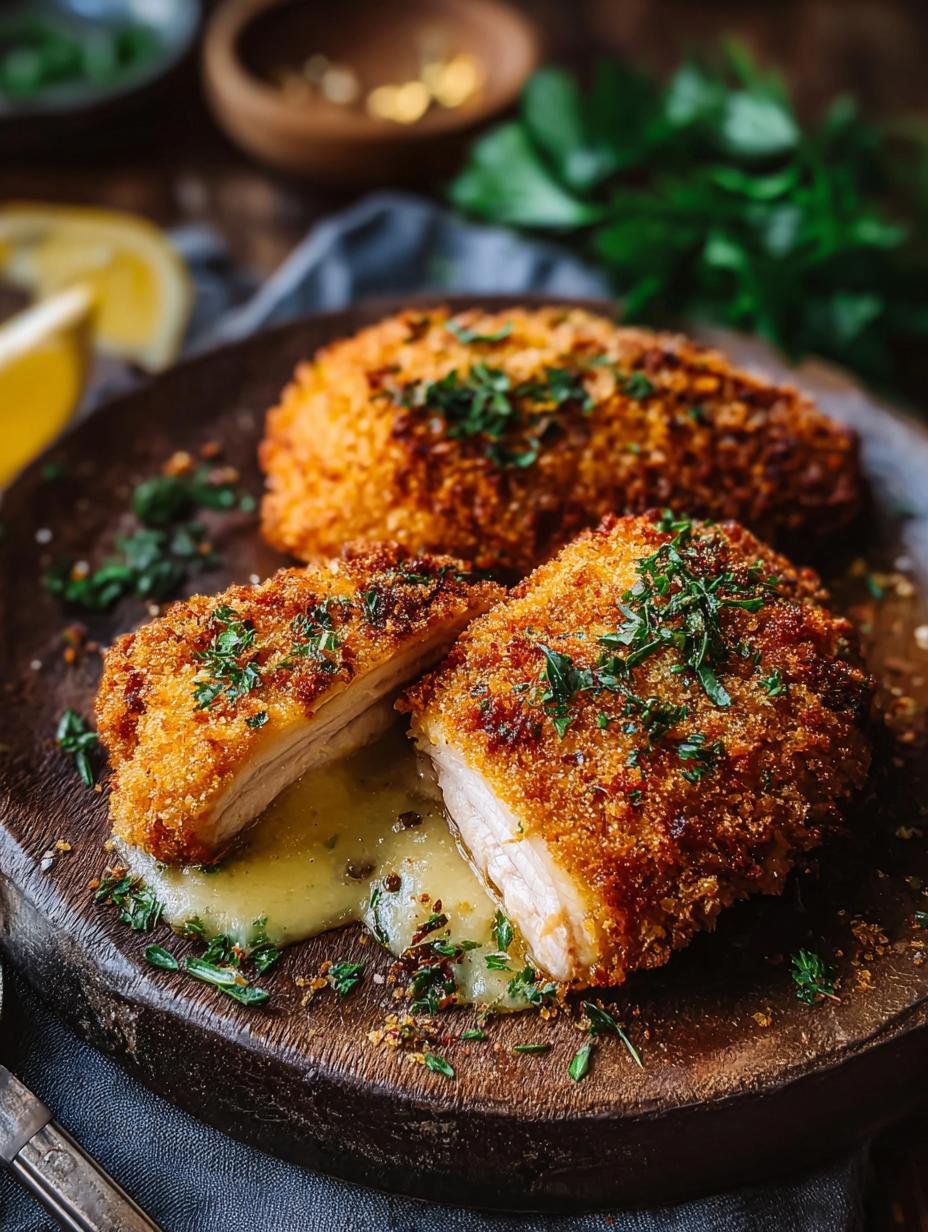
Chicken Kiev has been a cornerstone of impressive home cooking in my family for years. I vividly remember my first time trying this golden, crispy chicken dish at a fancy restaurant; the way the garlic herb butter exploded with flavor was absolutely unforgettable. It felt so luxurious, yet I’ve discovered through trial and error that making a delicious and easy Chicken Kyiv at home is totally achievable. This recipe brings that restaurant-quality experience right to your kitchen, with juicy chicken breasts, a fragrant garlic butter filling, and a perfectly golden crust. It’s a classic for a reason, and making this homemade Chicken Kiev will quickly become a favorite. Let’s get cooking!
Why You’ll Love This Easy Chicken Kiev
I know you’ll absolutely adore this recipe, and here’s why:
- It delivers an incredibly rich and savory taste thanks to the flavorful garlic butter center.
- This easy Chicken Kiev recipe is surprisingly quick to prepare, perfect for busy weeknights.
- You get a wonderfully crispy Chicken Kiev crust that everyone will rave about.
- It’s a budget-friendly way to enjoy a classic dish without dining out.
- The whole family will love this impressive yet simple meal, even picky eaters.
- You can feel good knowing you’re serving a homemade, delicious meal.
- The satisfaction of creating this perfectly crispy Chicken Kiev from scratch is unmatched.
Ingredients for Homemade Chicken Kiev
Gathering your ingredients is the first step to creating this delightful dish. Here’s everything you’ll need for a perfect garlic butter chicken breast experience:
- 4 boneless, skinless chicken breasts – about 6-8 oz each, ensure they are thick enough to stuff.
- 1/2 teaspoon salt – for seasoning the chicken.
- 1/4 teaspoon black pepper – freshly ground is always best.
- 1/4 teaspoon garlic powder – adds an extra layer of flavor to the chicken.
- 1/2 cup unsalted butter, softened – this is the heart of your garlic butter filling, make sure it’s at room temperature for easy mixing.
- 2 tablespoons fresh parsley, finely chopped – brightens up the flavor profile.
- 2 cloves garlic, minced – essential for that classic intense garlic butter taste.
- 1 teaspoon lemon zest (optional) – a little zing that really makes the flavors pop.
- 1/2 cup all-purpose flour – for the first dredging stage.
- 2 large eggs, beaten – helps the breadcrumbs adhere beautifully.
- 1 cup breadcrumbs – I prefer panko for extra crispiness, but regular works too.
- 1/2 cup vegetable oil for frying – or enough to generously cover the bottom of your skillet.
How to Make Traditional Chicken Kiev
Making a truly delicious traditional Chicken Kiev at home might seem daunting, but I promise you, it’s easier than you think! Follow these steps carefully, and you’ll soon be enjoying a golden, crispy, and incredibly flavorful meal. This stuffed chicken breast recipe is worth every moment.
- Step 1: First, let’s prepare that irresistible butter filling. In a small bowl, combine your softened unsalted butter, finely minced garlic, and the vibrant, finely chopped fresh parsley. If you’re using lemon zest, add it now for an extra zing. Mix these ingredients until they are perfectly smooth and evenly combined. Once mixed, transfer this garlic herb butter to a piece of plastic wrap or parchment paper, roll it into a log, and refrigerate it for at least 30 minutes. You want it firm enough to handle easily.
- Step 2: While your butter chills, prepare your chicken. Carefully slice a deep pocket into the side of each boneless, skinless chicken breast. It’s crucial not to cut all the way through, as we need that pocket to hold our precious garlic butter. This is a key step in any good stuffed chicken breast recipe.
- Step 3: Once the garlic butter is firm, divide it into equal portions, one for each chicken breast. Retrieve your chicken breasts and gently stuff one portion of the chilled butter mixture into each pocket. Press the edges of the chicken firmly together to seal in the butter. If you’re worried about leakage, you can use a toothpick or two to secure the opening.
- Step 4: Now for the seasoning and breading. Preheat your oven to 375°F (190°C). Season the outside of your butter-stuffed chicken breasts generously with salt, black pepper, and garlic powder. Set up your dredging station: one shallow dish with all-purpose flour, another with beaten eggs, and a third with breadcrumbs.
- Step 5: Dredge each seasoned chicken breast first in the flour, ensuring it’s fully coated. Then, dip it into the beaten eggs, letting any excess drip off. Finally, coat it thoroughly in the breadcrumbs, pressing gently to make sure they adhere well. This breading will give you that signature crispy exterior.
- Step 6: Heat about 1/2 inch of vegetable oil in a large, heavy-bottomed skillet over medium heat. Once the oil is shimmering, carefully place the breaded chicken breasts into the hot oil. Pan-fry them for about 3 to 4 minutes per side, until they are beautifully golden brown and crispy. This initial fry locks in moisture and creates that perfect crust.
- Step 7: Transfer the pan-fried chicken breasts to a baking sheet. Place the baking sheet into your preheated oven and bake for an additional 15 to 18 minutes. The chicken is fully cooked when its internal temperature reaches 165°F (74°C). The aroma filling your kitchen right now is simply divine!
- Step 8: Once baked, remove the chicken from the oven and let it rest for 5 to 10 minutes before serving. This resting period is essential; it allows the juices, especially that incredible melted garlic butter, to redistribute throughout the chicken, ensuring every bite of your traditional Chicken Kiev is bursting with flavor. Enjoy!
Pro Tips for the Best Chicken Kiev
I’ve learned a few tricks over the years that truly elevate this dish. These pro tips will help you achieve the most delicious and perfectly cooked Chicken Kiev every time:
- Always use cold, firm butter for the filling; this helps prevent it from leaking out during cooking.
- Don’t overmix the chicken and butter or it can become tough.
- Ensure your chicken is completely sealed after stuffing, using toothpicks if necessary, to keep that wonderful garlic butter inside.
- Use panko breadcrumbs for an extra crunchy coating that makes for a truly crispy Chicken Kiev.
- Let the chicken rest for at least 5-10 minutes after baking; this allows the juices and melted butter to redistribute.
What’s the secret to perfect Pan-fried Chicken Kiev?
The real secret lies in the double-dredging and the initial pan-fry. This creates a strong, crispy crust that locks in all the moisture and flavor. Don’t rush this step; a golden-brown exterior before baking is key for a truly crispy Chicken Kiev.
Can I make Chicken Kiev ahead of time?
Absolutely! You can prepare the stuffed and breaded chicken breasts up to 24 hours in advance. Just cover them loosely with plastic wrap and refrigerate. When ready to cook, proceed with the pan-frying and baking steps, adding a few extra minutes to the baking time if they’re very cold.
How do I avoid common mistakes with Chicken Kiev?
The most common mistake is butter leakage. To prevent this, ensure your butter is very cold and your chicken breast pocket is well-sealed. Another pitfall is overcooking, which leads to dry chicken; always use a meat thermometer to ensure it reaches 165°F (74°C) without going over.
Best Ways to Serve Chicken Kiev
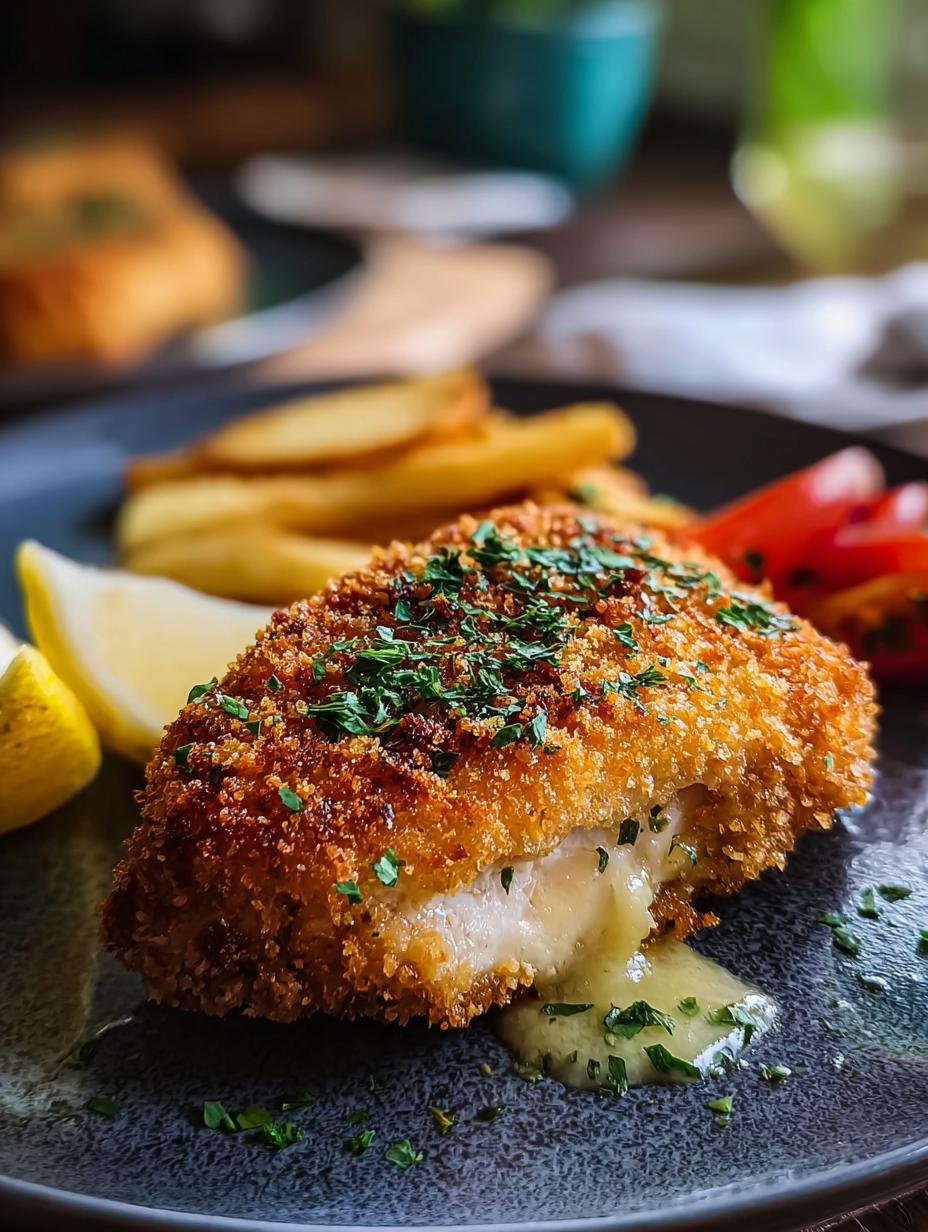
Once you’ve mastered this delicious dish, you’ll want to know the best ways to serve your perfectly cooked Chicken Kiev. I find that the rich, buttery flavors of Chicken Kiev pair beautifully with simple, fresh sides that complement without overpowering. This dish is truly a showstopper on its own!
For a classic pairing, I love serving my Chicken Kiev with creamy mashed potatoes and a vibrant green vegetable, such as steamed asparagus or green beans. The potatoes soak up any delicious garlic butter that escapes, and the greens add a refreshing contrast. Another fantastic option is a light, crisp garden salad with a simple vinaigrette, which cuts through the richness of the chicken.
If you’re looking to complete your meal with ideas from a baked Chicken Kiev recipe, consider roasted root vegetables like carrots and parsnips, which offer a delightful sweetness. No matter how you choose to serve it, this flavorful chicken dish is sure to impress everyone at the table.
Nutrition Facts for Chicken Kiev
Understanding the nutritional value of your homemade Chicken Kiev can be helpful for meal planning. Based on the recipe, here are the estimated nutrition facts per serving (this recipe makes 4 servings):
- Calories: 500
- Protein: 35g
- Fat: 35g
- Saturated Fat: 15g
- Unsaturated Fat: 18g
- Trans Fat: 0.5g
- Carbohydrates: 20g
- Fiber: 1g
- Sugar: 2g
- Sodium: 450mg
- Cholesterol: 120mg
Nutritional values for this Chicken Kiev are estimates and may vary based on specific ingredients used and portion sizes. Enjoy your delicious and satisfying meal!
How to Store and Reheat Chicken Kiev
Once you’ve savored your delicious Chicken Kiev, you might find yourself with leftovers – a delightful problem to have! Proper storage and reheating are key to enjoying this dish again without sacrificing its amazing flavor or texture. I always make extra because this easy Chicken Kiev recipe is fantastic for meal prep.
First, allow any leftover Chicken Kiev to cool completely to room temperature within two hours of cooking. Then, transfer the pieces to an airtight container. You can store them in the refrigerator for up to 3-4 days. For longer storage, you can freeze individual portions. Wrap each piece tightly in plastic wrap, then place them in a freezer-safe bag or container, where they will keep well for up to 3 months.
When you’re ready to enjoy your Chicken Kiev again, reheating it properly is crucial to maintain that crispy exterior. I recommend reheating in the oven or an air fryer. Preheat your oven to 350°F (175°C) and bake for 15-20 minutes, or until heated through. An air fryer at 350°F (175°C) for 8-10 minutes also works wonders, helping to restore that satisfying crunch. Avoid the microwave if you can, as it tends to make the breading soggy.
Frequently Asked Questions About Chicken Kiev
What is Chicken Kiev, exactly?
Chicken Kiev is a classic European dish featuring a boneless chicken breast that’s pounded flat, rolled around a piece of cold herb and garlic butter, then breaded and fried or baked. When you cut into it, the melted butter bursts out, creating a wonderfully rich and flavorful experience. It’s a truly iconic and delicious meal.
How do I prevent the butter from leaking out of my Chicken Kiev?
The key to preventing butter leakage in your Chicken Kiev is to use very cold, firm butter for the filling. Also, ensure the chicken breast is tightly rolled and the edges are well-sealed. You can even use a toothpick or two to secure the seam before breading. A good, thick breading also helps create a protective barrier.
Can I bake Chicken Kiev instead of frying it?
Yes, absolutely! While traditionally pan-fried for a crispy crust, you can certainly bake Chicken Kiev. For a healthier option, you can lightly pan-fry it first to get some color, then finish baking it at 375°F (190°C) until cooked through. Some recipes even call for baking it from start to finish, often after a light spray of oil for crispiness.
What are the best side dishes to serve with Chicken Kiev?
For me, the best sides for Chicken Kiev are those that complement its richness without competing. Creamy mashed potatoes are a classic choice, perfect for soaking up any buttery goodness. Steamed green vegetables like asparagus or green beans add a fresh contrast. A simple side salad also works wonderfully to balance the meal.
Variations of Chicken Kiev You Can Try
While the classic Chicken Kiev is a masterpiece, there are many ways to put your own spin on this beloved dish! I love experimenting with different flavors and cooking methods to keep things exciting. These variations allow you to customize your Chicken Kiev with garlic butter filling to suit various tastes or dietary needs.
- Spicy Chicken Kiev: For those who love a kick, add a pinch of red pepper flakes or a dash of hot sauce to your garlic butter filling. This gives a fiery twist to the traditional Chicken Kiev with garlic butter filling.
- Cheese-Stuffed Kiev: Incorporate a small amount of grated Parmesan or a slice of provolone cheese with the garlic butter for an extra layer of richness and flavor.
- Baked or Air-Fried Kiev: If you’re looking for a lighter option, bake your breaded chicken breasts in the oven at 375°F (190°C) or cook them in an air fryer. This reduces the amount of oil but still delivers a wonderfully crispy exterior, making it a healthier take on easy Chicken Kiev.
- Herb Variations: Experiment with different fresh herbs in your butter, such as dill, chives, or tarragon, to create unique flavor profiles for your Chicken Kiev.

1 Incredible Chicken Kiev Recipe Ready in 30 Mins
- Total Time: 45 minutes
- Yield: 4 servings
- Diet: Halal
Description
This Easy Chicken Kiev recipe delivers all the rich, buttery flavor of the classic dish with less effort. Juicy chicken breasts are stuffed with a flavorful garlic herb butter, coated in crispy breadcrumbs, pan-fried until golden, and then finished in the oven.
Ingredients
- Boneless, skinless chicken breasts
- Salt
- Black pepper
- Garlic powder
- Unsalted butter, softened
- Fresh parsley, finely chopped
- Minced garlic
- Lemon zest (optional)
- All-purpose flour
- Eggs, beaten
- Breadcrumbs
- Vegetable oil for frying
Instructions
- In a small bowl, combine softened butter, minced garlic, finely chopped fresh parsley, and lemon zest if using. Mix until smooth and refrigerate until firm enough to shape.
- Carefully slice a pocket into the side of each boneless, skinless chicken breast, being sure not to cut all the way through.
- Divide the chilled garlic herb butter mixture and stuff it into each chicken pocket. Press the edges to seal, using toothpicks if necessary to hold it closed.
- Season the outside of the stuffed chicken with salt, black pepper, and garlic powder.
- Dredge each chicken breast in all-purpose flour, dip into the beaten eggs, then coat evenly in breadcrumbs, pressing to adhere for a crispy chicken Kiev.
- Heat vegetable oil in a skillet over medium heat. Fry the chicken on each side until golden brown and crispy, about 3 to 4 minutes per side.
- Transfer the chicken to a preheated oven at 375°F (190°C) and bake for 15 to 18 minutes, or until fully cooked and the internal temperature reaches 165°F (74°C).
- Let rest briefly before serving to allow the garlic butter to settle inside.
Notes
- To prevent the butter from leaking, ensure the chicken is well sealed and the garlic butter mixture is cold before stuffing.
- Panko breadcrumbs can be used for extra crunch, creating a crispy Chicken Kiev.
- Chicken Kiev pairs well with mashed potatoes, rice, or a crisp green salad.
- Leftovers can be reheated in the oven to preserve the crispy texture. Avoid microwaving to keep the crust from becoming soggy.
- Prep Time: 20 minutes
- Cook Time: 25 minutes
- Category: Brunch
- Method: Pan-frying and Baking
- Cuisine: European
Nutrition
- Serving Size: 1 chicken breast
- Calories: 500
- Sugar: 2g
- Sodium: 450mg
- Fat: 35g
- Saturated Fat: 15g
- Unsaturated Fat: 18g
- Trans Fat: 0.5g
- Carbohydrates: 20g
- Fiber: 1g
- Protein: 35g
- Cholesterol: 120mg


Leave a Reply