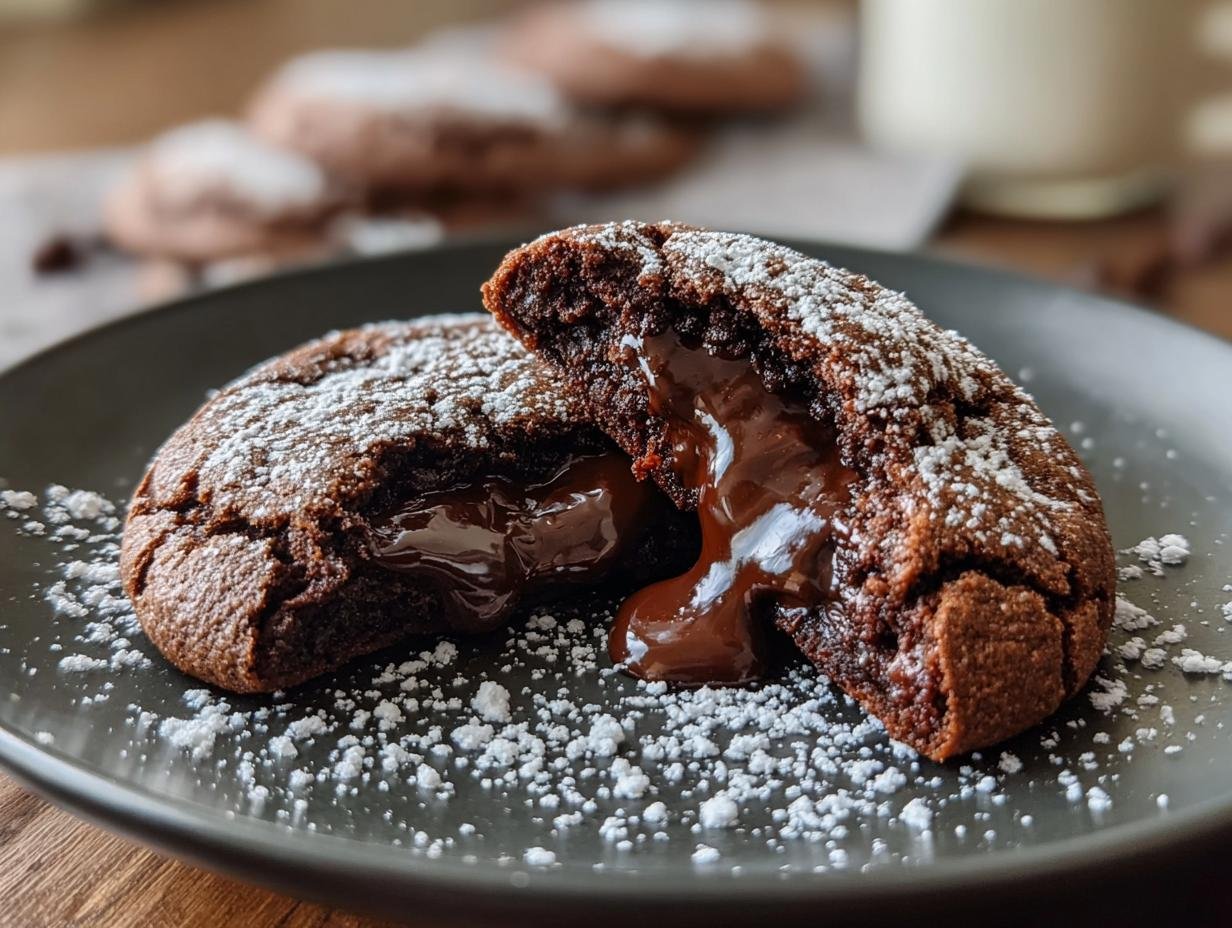
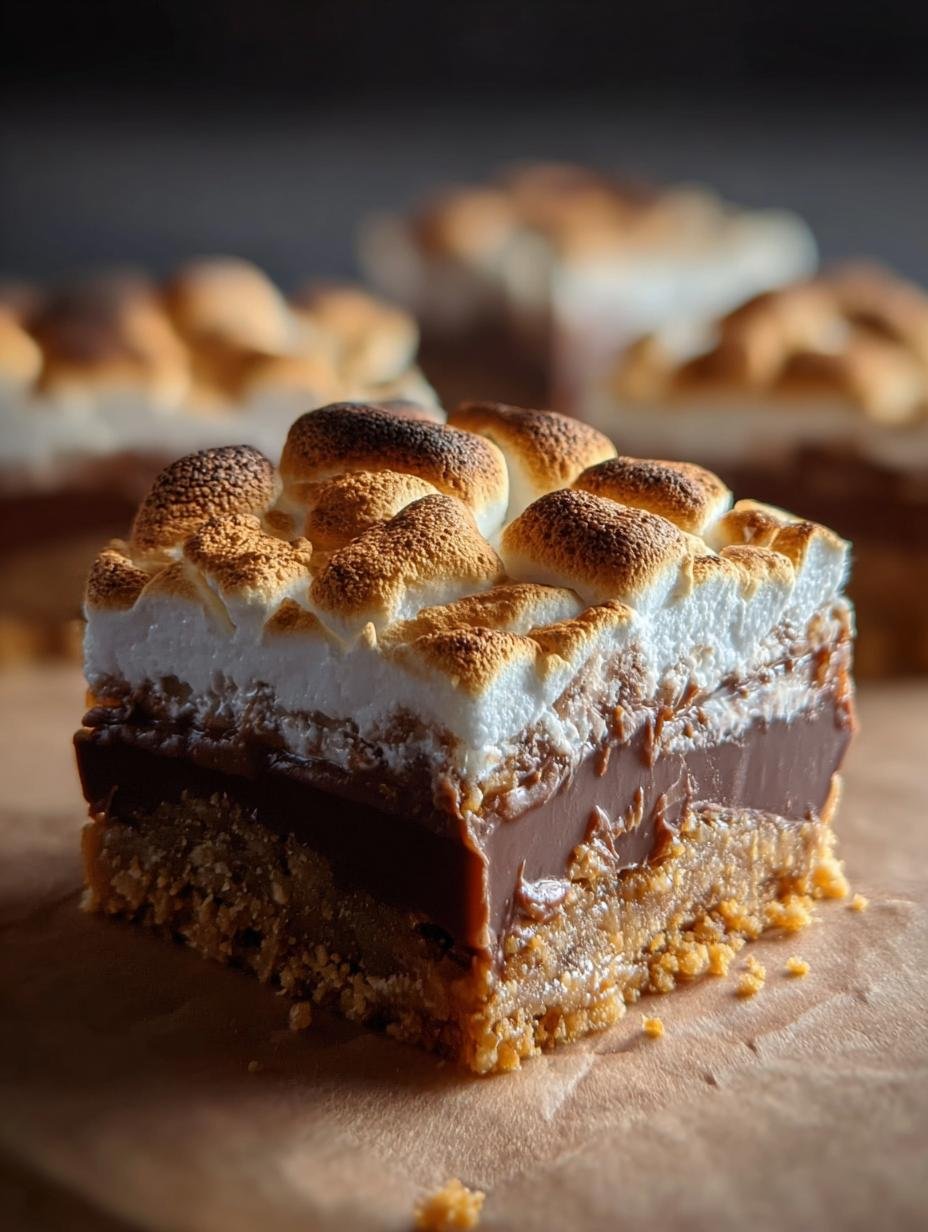
Chocolate lava cookies have been my ultimate comfort food for years, ever since I first tasted one at a local bakery. The idea of a cookie that holds a warm, gooey surprise inside still excites me! I remember the first time I tried to recreate that magic at home, aiming for that perfect molten chocolate center. The aroma that filled my kitchen was incredible – rich, dark chocolate and sweet vanilla. These aren’t just cookies; they’re an experience. If you’re looking for truly decadent chocolate cookies with a molten center, you’ve come to the right place. Let’s get baking!
Why You’ll Love These Chocolate Lava Cookies
- An incredibly rich and decadent taste that satisfies any sweet craving.
- Super quick prep time means you can whip these up even on a weeknight.
- Surprisingly budget-friendly ingredients make it an affordable treat.
- The perfect balance of a chewy cookie exterior and a molten chocolate interior.
- These gooey chocolate cookies are a guaranteed hit with kids and adults alike.
- They bake up beautifully, making them ideal for impressing guests.
- The sheer joy of digging into these gooey chocolate cookies is unmatched.
- A delightful homemade dessert that feels truly special.
Chocolate Lava Cookie Ingredients
Gathering the right chocolate lava cookie ingredients is the first step to baking these amazing treats. You’ll need 1 cup unsalted butter, softened, which gives the cookies a rich flavor and tender crumb. For sweetness, we’ll use 1 cup brown sugar for moisture and chewiness, and ½ cup granulated sugar for structure. Two large eggs act as binders, and 1 teaspoon vanilla extract enhances the chocolate flavor. For the dry ingredients, grab 2¼ cups all-purpose flour, ½ cup unsweetened cocoa powder for that deep chocolate taste, 1 teaspoon baking soda for leavening, and ½ teaspoon salt to balance the sweetness. Finally, for that signature molten center, you’ll need 1 cup semi-sweet chocolate chips mixed into the dough and 12 to 14 chocolate truffles or baking chocolate squares to place inside each cookie.
How to Make Chocolate Lava Cookies
Learning how to make chocolate lava cookies is easier than you think, and the results are pure magic! Follow these steps for the ultimate gooey chocolate cookies.
- Step 1: Preheat your oven to 350°F (175°C). Line a large baking sheet with parchment paper. This prevents sticking and ensures even baking.
- Step 2: In a large bowl, cream together the softened 1 cup unsalted butter, 1 cup brown sugar, and ½ cup granulated sugar until the mixture is light, fluffy, and pale in color. This creaming process incorporates air, which helps give the cookies structure.
- Step 3: Add the 2 large eggs one at a time, mixing thoroughly after each addition until fully incorporated. Stir in the 1 teaspoon vanilla extract for that classic warm aroma.
- Step 4: In a separate bowl, whisk together the 2¼ cups all-purpose flour, ½ cup unsweetened cocoa powder, 1 teaspoon baking soda, and ½ teaspoon salt. Whisking ensures the leavening agents and salt are evenly distributed, preventing pockets of bitterness.
- Step 5: Gradually add the dry ingredients to the wet mixture. Mix on low speed or with a spatula until just combined. Be careful not to overmix, as this can lead to tough cookies.
- Step 6: Gently fold in the 1 cup semi-sweet chocolate chips. These add little pockets of chocolatey goodness throughout the cookie.
- Step 7: Chill the dough in the refrigerator for about 30 minutes. This is a crucial step in the chocolate lava cookie baking instructions, as it firms up the dough, making it easier to handle and preventing the cookies from spreading too much in the oven.
- Step 8: Scoop about 2 tablespoons of chilled dough into your hands. Flatten it into a disc, and place one chocolate truffle or baking chocolate square in the center.
- Step 9: Carefully wrap the dough around the chocolate, ensuring it’s completely sealed to create a smooth ball. This traps the molten center.
- Step 10: Place the dough balls on the prepared baking sheet, leaving about 2 inches between each one.
- Step 11: Bake for 10 to 12 minutes. You’re looking for the edges to be set and lightly golden, but the centers should still appear soft and slightly underbaked. This is key to achieving that perfect molten core.
- Step 12: Let the cookies cool on the baking sheet for 5 minutes. This allows them to set up slightly before you move them.
- Step 13: Transfer the cookies to a wire rack to cool slightly. Serve the chocolate lava cookies warm to experience the ultimate gooey, molten center. The aroma alone is worth it!
Pro Tips for the Best Chocolate Lava Cookies
To guarantee those perfect, gooey centers every time, a few tricks up my sleeve make all the difference. You’ll be making the best chocolate lava cookies in no time!
- Use high-quality chocolate truffles or baking chocolate squares for the lava center; they melt beautifully.
- Don’t skip chilling the dough! It’s essential for preventing excessive spreading and keeping that molten core intact.
- Bake just until the edges are set. The centers should still look soft and slightly underbaked – that’s where the magic happens.
- Letting the cookies rest on the hot baking sheet for a few minutes after they come out of the oven is crucial for them to set up properly.
What’s the secret to perfect chocolate lava cookies?
The real secret to achieving those perfect chocolate lava cookies is in the baking time. You want to pull them out when the edges look set but the center is still soft and jiggly. This ensures a molten core when you bite into them!
Can I make chocolate lava cookies ahead of time?
Yes, you absolutely can! Prepare the dough and form the balls with the chocolate centers, then store them in an airtight container in the refrigerator for up to 24 hours before baking. This makes them perfect for make-ahead desserts. For more dessert inspiration, check out our dessert recipes.
How do I avoid common mistakes with chocolate lava cookies?
Avoid overbaking at all costs if you want gooey chocolate cookies; watch them closely! Also, ensure the dough completely encases the chocolate center to prevent leaks. Chilling the dough is non-negotiable to prevent them from spreading too thin. For more baking tips, you might find resources on ingredient properties helpful.
Best Ways to Serve Warm Chocolate Lava Cookies
These warm chocolate lava cookies are an indulgence on their own, but pairing them thoughtfully elevates the experience even further. For a truly decadent treat, serve them straight from the oven with a scoop of creamy vanilla bean ice cream. The contrast between the warm, gooey cookie and the cold, smooth ice cream is pure bliss. Another fantastic option is to dust them lightly with powdered sugar or serve them with a dollop of fresh whipped cream. If you’re aiming for something a bit more sophisticated, consider pairing these rich chocolate lava cookies with a small glass of milk or a rich espresso to cut through the sweetness. You might also enjoy our Pistachio Pavlova Meringue Cakes for another delightful dessert.
Nutrition Facts for Chocolate Lava Cookies
When you’re indulging in these delightful treats, it’s helpful to know what you’re enjoying. Here’s a breakdown of the estimated nutritional information per serving for these amazing chocolate lava cookies.
- Calories: Approx. 250-300
- Fat: Approx. 15-20g
- Saturated Fat: Approx. 8-10g
- Protein: Approx. 3-4g
- Carbohydrates: Approx. 30-35g
- Fiber: Approx. 2-3g
- Sugar: Approx. 20-25g
- Sodium: Approx. 100mg
Nutritional values are estimates and may vary based on specific ingredients used, especially the type of chocolate used for the center. For more information on general baking ingredients, you can explore resources on flour.
How to Store and Reheat Chocolate Lava Cookies
Keeping your homemade chocolate lava cookies fresh is easy! Once baked, let them cool completely on a wire rack. Store the cooled cookies in an airtight container at room temperature for up to 3-4 days. For longer storage of your delicious chocolate lava cookies at home, you can freeze them. After they’ve cooled, wrap individual cookies tightly in plastic wrap, then place them in a freezer-safe bag or container. They’ll stay good in the freezer for up to 3 months. To reheat, you can gently warm them in the microwave for about 10-15 seconds to bring back that signature molten center. Alternatively, you can pop them into a 300°F (150°C) oven for a few minutes until warmed through. If you’re looking for other cookie recipes, try our Cinnamon Orange Jam Linzer Cookies.
Frequently Asked Questions About Chocolate Lava Cookies
What are chocolate lava cookies?
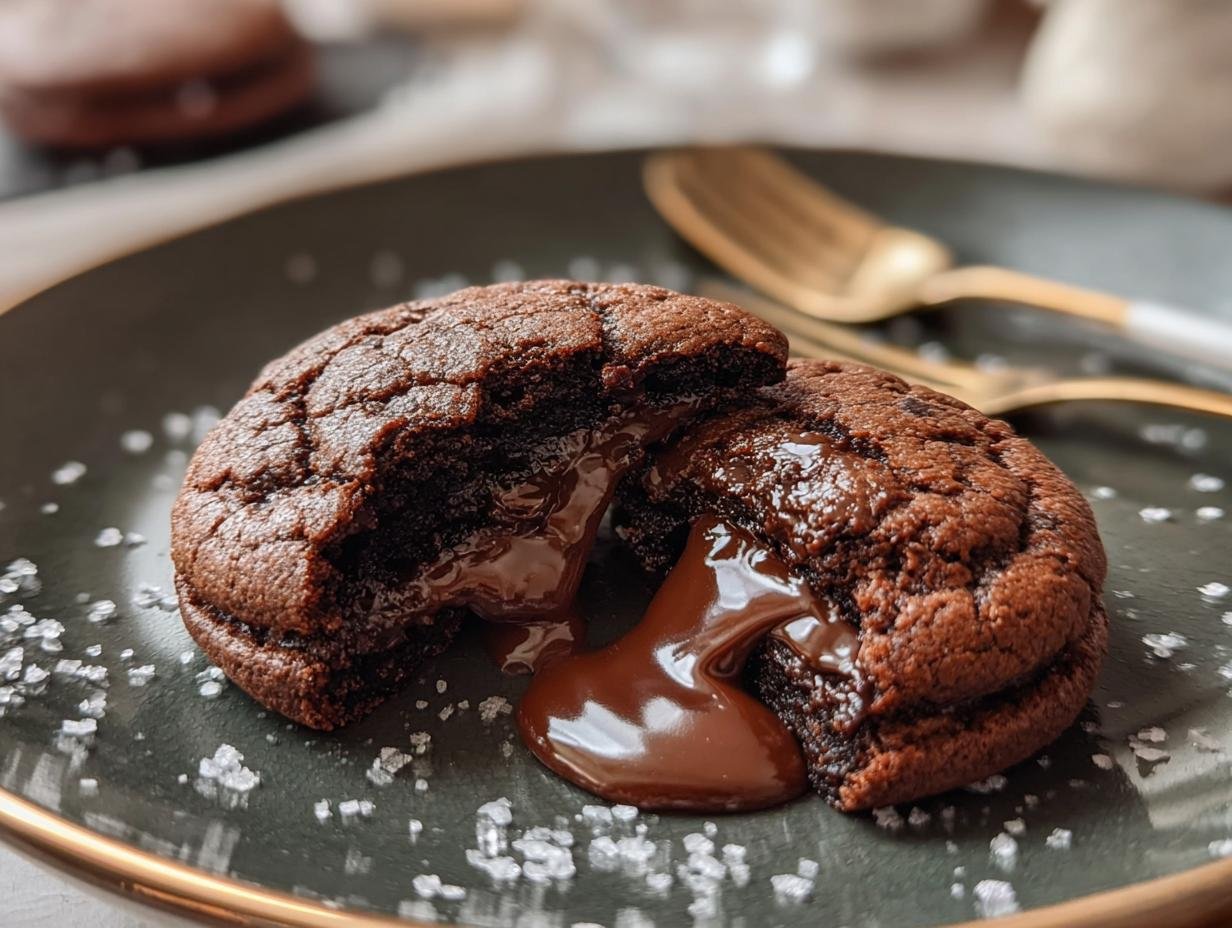
Chocolate lava cookies are a delightful hybrid, combining the familiar chewiness of a cookie with the decadent, molten center of a lava cake. They’re typically baked just until the edges are set, leaving the inside wonderfully gooey and rich with melted chocolate.
Is there an easy chocolate lava cookie recipe for beginners?
Absolutely! This recipe is designed to be straightforward, even for beginners. The key is chilling the dough and careful baking. You’ll find that following these steps makes an easy chocolate lava cookie recipe achievable for anyone wanting a truly indulgent treat. For other easy recipes, consider our Easy Avocado Toast Recipe.
Can I use different types of chocolate for the lava center?
Yes! While semi-sweet chocolate chips are classic, feel free to experiment. Dark chocolate truffles or squares will give a richer flavor, while white chocolate can offer a sweeter contrast. Just ensure whatever you use melts well and is roughly bite-sized. For a different kind of chocolate treat, explore our Spaghetti with Garlic and Oil.
How do I ensure the cookie isn’t overbaked and maintains its gooey center?
The trick is to watch the edges closely. When they look set and slightly golden, but the center still appears soft and slightly underbaked, it’s time to take them out. They’ll continue to cook slightly on the hot baking sheet, setting the center to that perfect molten consistency.
Variations of Chocolate Lava Cookies You Can Try
Once you’ve mastered the classic recipe, you’ll love experimenting with these fun variations of chocolate lava cookies. These twists add exciting new flavors and textures that keep things interesting.
- Dark Chocolate Lava Cookies: For a more intense, sophisticated chocolate flavor, swap the semi-sweet chocolate chips for dark chocolate chips and use dark chocolate squares or truffles for the molten center. This creates a wonderfully rich chocolate cookie experience.
- Chocolate Chip Lava Cookies: If you can’t get enough chocolate chips, try adding an extra half cup of your favorite chocolate chips to the dough. This ensures even more pockets of melted goodness throughout your cookies, complementing the gooey center.
- Vegan Chocolate Lava Cookies: Adapt this recipe for a vegan version by using a plant-based butter substitute, a flax egg (1 tablespoon flaxseed meal mixed with 3 tablespoons water, let sit for 5 minutes), and vegan chocolate chips or truffles. Ensure your cocoa powder is also vegan.
- White Chocolate Lava Cookies: For a sweeter, creamier variation, use white chocolate chips in the dough and white chocolate baking squares for the center. These offer a delightful contrast to the rich cocoa cookie.

Iconic Chocolate Lava Cookies: 10 Must-Try Tips
- Total Time: 42 minutes
- Yield: 12–14 cookies 1x
- Diet: Vegetarian
Description
Experience the ultimate indulgence with these Chocolate Lava Cookies. Each cookie offers the perfect chewy texture of a classic chocolate cookie, combined with a surprise molten chocolate center that oozes with richness. They are a delightful cross between a cookie and a lava cake, perfect for impressing guests or treating yourself.
Ingredients
- 1 cup unsalted butter, softened
- 1 cup brown sugar
- ½ cup granulated sugar
- 2 large eggs
- 1 teaspoon vanilla extract
- 2¼ cups all-purpose flour
- ½ cup unsweetened cocoa powder
- 1 teaspoon baking soda
- ½ teaspoon salt
- 1 cup semi-sweet chocolate chips
- 12 to 14 chocolate truffles or baking chocolate squares (for the lava center)
Instructions
- Preheat your oven to 350°F (175°C). Line a large baking sheet with parchment paper.
- In a large bowl, cream together the softened butter, brown sugar, and granulated sugar until light and fluffy.
- Add the eggs one at a time, mixing well after each addition. Stir in the vanilla extract.
- In a separate bowl, whisk together the flour, unsweetened cocoa powder, baking soda, and salt.
- Gradually add the dry ingredients to the wet mixture, mixing until just combined.
- Gently fold in the semi-sweet chocolate chips.
- Chill the dough in the refrigerator for about 30 minutes.
- Scoop about 2 tablespoons of chilled dough into your hands, flatten it into a disc, and place one chocolate truffle or baking square in the center.
- Carefully wrap the dough around the chocolate, sealing it completely to form a ball.
- Place the dough balls on the prepared baking sheet, leaving space between them.
- Bake for 10 to 12 minutes, or until the edges are set but the centers are still soft. Avoid overbaking to maintain the molten center.
- Let the cookies cool on the baking sheet for 5 minutes before transferring them to a wire rack to cool slightly.
- Serve the Chocolate Lava Cookies warm to enjoy the gooey center.
Notes
- Use high-quality chocolate truffles or baking squares for the best molten center.
- Chilling the dough is crucial for preventing the cookies from spreading and for holding the center.
- To reheat, microwave a cookie for 10-15 seconds to revive the molten center.
- Dough can be frozen after forming into balls and baked from frozen with an additional 1-2 minutes of baking time.
- Store baked cookies in an airtight container at room temperature for up to 3 days.
- Prep Time: 20 minutes
- Cook Time: 12 minutes
- Category: Dessert
- Method: Baking
- Cuisine: American
Nutrition
- Serving Size: 1 cookie
- Calories: Approx. 250-300
- Sugar: Approx. 20-25g
- Sodium: Approx. 100mg
- Fat: Approx. 15-20g
- Saturated Fat: Approx. 8-10g
- Unsaturated Fat: Approx. 5-7g
- Trans Fat: 0g
- Carbohydrates: Approx. 30-35g
- Fiber: Approx. 2-3g
- Protein: Approx. 3-4g
- Cholesterol: Approx. 50-60mg


Leave a Reply