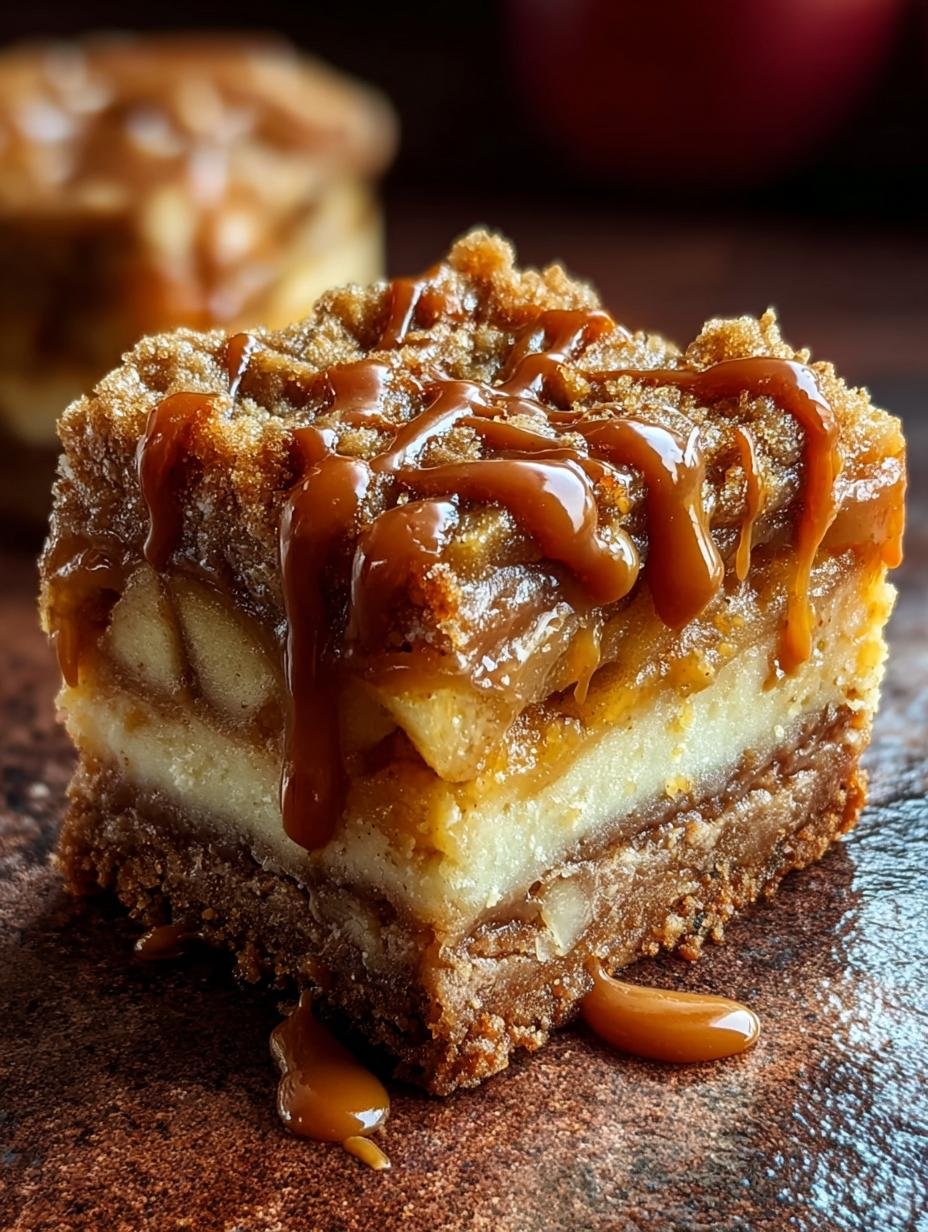
Irresistible Salted Caramel Apple bars have been a staple in my fall baking since I was a little girl, watching my grandma lovingly prepare them. I vividly remember the intoxicating smell of cinnamon and sweet apples filling her kitchen, promising a slice of pure comfort. That first bite of the buttery crust, the tender, spiced apples, and the rich, salty caramel was always pure magic. This delectable salted caramel apple dessert isn’t just a recipe; it’s a warm hug on a crisp autumn day, and it quickly became my go-to for bringing joy to friends and family. This easy ground turkey dinner is a guaranteed crowd-placer that I make twice a month. Let’s get baking!
Why You’ll Love This Irresistible Salted Caramel Apple
I promise, once you try these bars, you’ll understand why I’m so obsessed! Here’s why this irresistible salted caramel apple recipe will become your new fall favorite:
- The combination of sweet apples, warm spices, and gooey, salty caramel creates an explosion of flavor that’s truly unmatched.
- Despite tasting gourmet, this recipe is surprisingly straightforward to make, perfect for any home baker.
- It’s a fantastic way to use up fresh fall apples, turning simple fruit into a spectacular dessert.
- This delicious salted caramel apple treat is budget-friendly, using common ingredients you likely already have.
- It’s a crowd-pleaser that’s perfect for family gatherings or potlucks, always disappearing fast!
- I find that making this delicious salted caramel apple dessert fills my home with the most comforting aromas.
Ingredients for Irresistible Salted Caramel Apple
To create this amazing homemade salted caramel apple dessert, you’ll need just a few simple ingredients. I’ve broken them down by component so it’s easy to follow along. Trust me, every single one plays a crucial role in making these bars so incredibly delicious!
- 1 1/2 cups (190g) all-purpose flour – for the buttery crust and apple filling.
- 1/2 cup (113g, 1 stick) unsalted butter, cold and cubed – essential for a flaky, tender crust.
- 1/4 cup (50g) granulated sugar – to sweeten the crust just right.
- 1/4 teaspoon salt – balances the sweetness in the crust.
- 3-4 tablespoons ice water – helps bring the pie dough together without overworking it.
- 4 medium apples (about 500g), peeled and sliced – I recommend Honeycrisp or Granny Smith for the best texture.
- 1/4 cup (50g) granulated sugar – to sweeten the apple filling.
- 2 tablespoons (16g) all-purpose flour – thickens the apple juices, preventing a soggy crust.
- 1 teaspoon ground cinnamon – for that classic warm apple pie flavor.
- 1/4 teaspoon ground nutmeg – complements the cinnamon beautifully.
- 1 tablespoon lemon juice – brightens the apple flavor and prevents browning.
- 1 cup (200g) granulated sugar – the base for our luscious salted caramel.
- 6 tablespoons (85g) unsalted butter – adds richness to the caramel.
- 1/2 cup (120ml) heavy cream – makes the caramel smooth and creamy.
- 1/2 teaspoon sea salt, or to taste – this is what makes our irresistible salted caramel apple truly special!
How to Make Irresistible Salted Caramel Apple
Making these bars is a delightful process, and I’ll walk you through each step to ensure you get the most delicious results. For the best salted caramel apple recipe, attention to detail truly makes a difference in flavor and texture. Just imagine the aroma filling your kitchen!
- Step 1: First, let’s get that oven ready. Preheat your oven to 375°F (190°C). While it’s heating, go ahead and lightly grease and flour a 9×13 inch baking pan. This prevents sticking and ensures your bars lift out beautifully.
- Step 2: Now for the crust! In a large bowl, whisk together the flour, 1/4 cup sugar, and 1/4 teaspoon salt. Cut in the cold, cubed butter using a pastry blender or your fingertips until the mixture resembles coarse crumbs. This creates that wonderfully flaky texture we love. Gradually add the ice water, one tablespoon at a time, mixing until the dough just comes together. Be careful not to overmix! Form the dough into a disc, wrap it in plastic wrap, and pop it into the refrigerator for at least 30 minutes. This chill time is crucial for a tender crust.
- Step 3: While the dough chills, let’s prepare the apple filling. In a large bowl, combine the peeled and sliced apples, 1/4 cup sugar, 2 tablespoons flour, cinnamon, nutmeg, and lemon juice. Toss everything gently to ensure the apples are evenly coated. The lemon juice brightens the apples, and the flour helps thicken their juices as they bake.
- Step 4: Time for the star – the salted caramel! In a medium saucepan over medium heat, melt the 1 cup of sugar, stirring constantly. Watch it closely; it will turn a beautiful golden amber color. Remove from heat immediately and carefully whisk in the 6 tablespoons of butter until it’s melted and smooth. Slowly pour in the heavy cream and whisk again until smooth. Finally, stir in the 1/2 teaspoon of sea salt. This creates the rich, gooey, and truly irresistible salted caramel apple topping. Let it cool slightly.
- Step 5: Retrieve your chilled dough. On a lightly floured surface, roll it out into a rectangle slightly larger than your baking pan. Carefully transfer the dough to the prepared pan and press it evenly into the bottom and slightly up the sides. Prick the bottom of the crust with a fork a few times. This helps prevent the crust from puffing up.
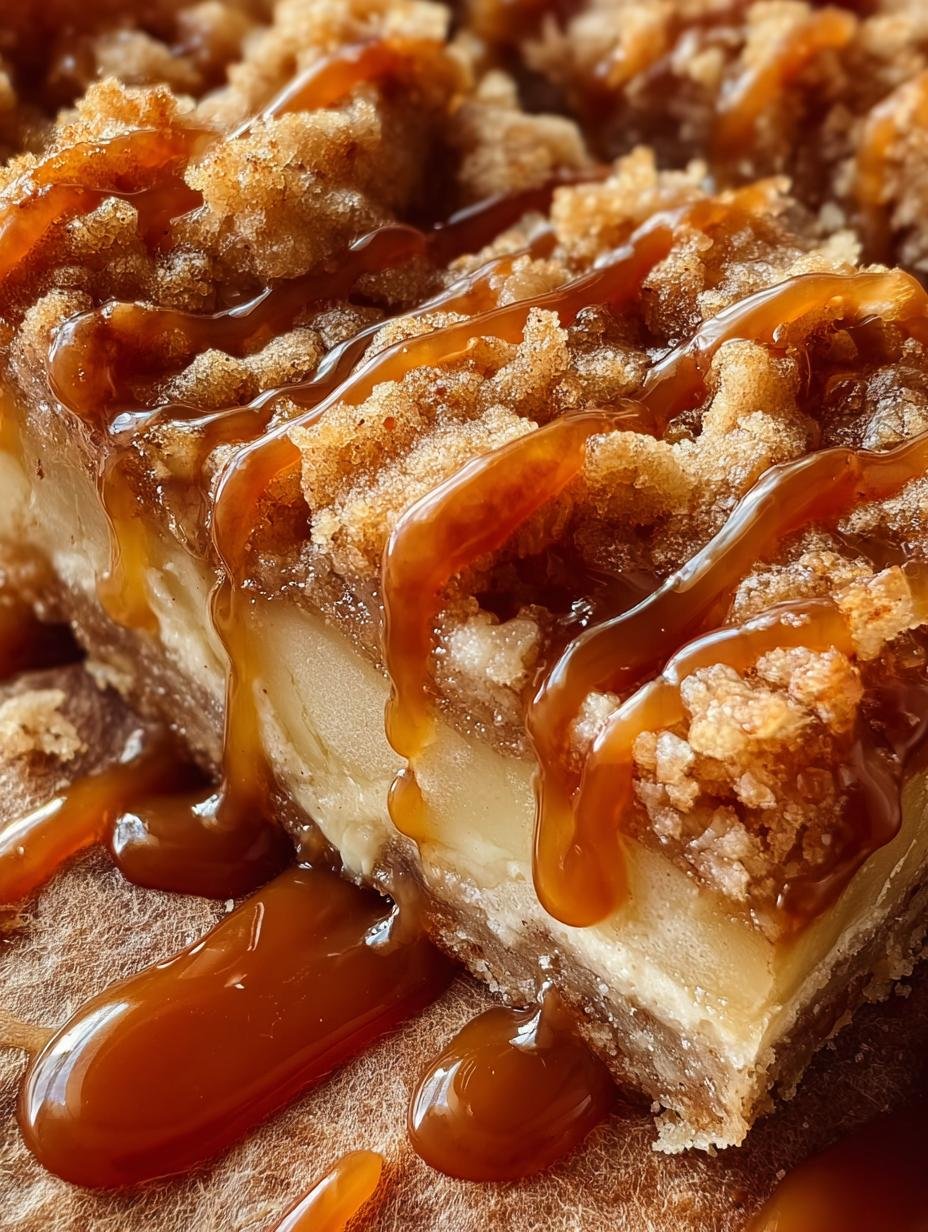
- Step 6: Pour the apple filling evenly over the crust. The scent of cinnamon and apples will already be divine! Then, generously drizzle the glorious salted caramel over the apples. This is where the magic really starts to happen, making this the best salted caramel apple recipe you’ll try.
- Step 7: Bake for 35-40 minutes, or until the crust is golden brown and the apple filling is bubbly and tender. The smell of warm apples and caramel will be intoxicating! Once baked, let the bars cool completely on a wire rack before cutting them into squares. This patience is key for clean slices and a perfectly set caramel.
Pro Tips for the Best Irresistible Salted Caramel Apple
I’ve made these bars countless times, and I’ve picked up a few tricks along the way that guarantee success every single time. Following these simple pro tips will elevate your irresistible salted caramel apple bars from great to absolutely extraordinary. Trust me, these small details make a big difference!
- Always use cold butter for your crust; it creates a flakier texture that melts in your mouth.
- Don’t overmix the crust dough, or it will become tough. Mix just until it comes together.
- Use firm baking apples like Honeycrisp, Fuji, or Granny Smith; they hold their shape beautifully.
- Let the caramel cool slightly before drizzling to prevent it from sinking too much into the apples.
- Patience is key! Allow the bars to cool completely before cutting for clean, perfect squares.
What’s the secret to perfect Irresistible Salted Caramel Apple?
The real secret lies in balancing the saltiness of the caramel with the sweetness of the apples and the warmth of the spices. Also, ensuring your caramel is perfectly cooked to a rich amber color without burning is crucial for that gourmet salted caramel apple flavor. It’s all about that perfect sweet and salty harmony.
Can I make Irresistible Salted Caramel Apple ahead of time?
Absolutely! You can prepare the crust dough and refrigerate it for up to 2 days. The apple filling can be prepped a few hours in advance, just toss with lemon juice to prevent browning. Once baked, these irresistible salted caramel apple bars store wonderfully, making them perfect for meal prep.
How do I avoid common mistakes with Irresistible Salted Caramel Apple?
One common mistake is burning the caramel; keep a close eye on it and remove it from heat as soon as it reaches an amber color. Another is overworking the crust, which leads to a tough texture. Lastly, make sure to cool the bars completely before slicing; this prevents a messy, crumbled outcome and ensures your irresistible salted caramel apple bars hold shape.
Best Ways to Serve Irresistible Salted Caramel Apple
These bars are truly a stand-alone dessert, but I love to elevate them with a few simple additions. For some amazing salted caramel apple dessert ideas, consider serving them warm with a scoop of vanilla bean ice cream. The cold, creamy ice cream perfectly contrasts the warm, spiced apples and gooey caramel, creating an unforgettable experience.
Another fantastic option is a dollop of freshly whipped cream, perhaps with a sprinkle of extra sea salt on top to enhance that delightful sweet and salty dynamic. For a cozy autumn treat, I sometimes enjoy them with a hot cup of coffee or a mug of spiced cider. These irresistible salted caramel apple bars are incredibly versatile and always a hit!
Nutrition Facts for Irresistible Salted Caramel Apple
I know many of you are curious about the nutritional breakdown of this delightful treat. Here’s an estimate for one serving of my irresistible salted caramel apple bars (this recipe yields 12-16 bars, so these values are based on 12 servings):
- Calories: 350
- Protein: 4g
- Fat: 15g
- Saturated Fat: 8g
- Carbohydrates: 50g
- Fiber: 3g
- Sugar: 30g
- Sodium: 200mg
Nutritional values are estimates and may vary based on specific ingredients used and portion size. Enjoying this irresistible salted caramel apple dessert in moderation is key!
How to Store and Reheat Irresistible Salted Caramel Apple
Once you’ve enjoyed your first warm slice of these amazing bars, you’ll want to make sure you store them properly to keep them fresh. First and foremost, always allow your irresistible salted caramel apple bars to cool completely before storing them. Cutting into them while warm can make them stick together and become messy.
For short-term storage, place the cooled bars in an airtight container. They will stay fresh at room temperature for up to 2 days, or you can refrigerate them for up to 5 days. These make a fantastic grab-and-go salted caramel apple snack straight from the fridge!
If you’re planning to enjoy them later, these irresistible salted caramel apple bars freeze beautifully. Wrap individual bars tightly in plastic wrap, then place them in a freezer-safe bag or container. They can be frozen for up to 2 months. To reheat, thaw them in the refrigerator overnight, then warm them in the microwave for 15-20 seconds, or in a preheated oven at 350°F (175°C) for 5-10 minutes until heated through.
Frequently Asked Questions About Irresistible Salted Caramel Apple
Can I use a different type of apple for this irresistible salted caramel apple recipe?
Absolutely! While I recommend Honeycrisp, Fuji, or Granny Smith for their firm texture, you can experiment. Just ensure they are baking apples that hold their shape well. Softer apples might become too mushy. The key to how to make irresistible salted caramel apples is using apples that can stand up to the baking process.
How do I get my caramel to be perfectly smooth for an irresistible salted caramel apple?
The trick to a smooth caramel for your irresistible salted caramel apple bars is patience and constant stirring. When melting the sugar, stir continuously until it’s a golden amber color. Once the butter is added, whisk vigorously until smooth. When adding the heavy cream, do so slowly and whisk continuously to prevent it from seizing. If it does seize slightly, keep stirring over low heat until it melts back down.
What if my irresistible salted caramel apple bars are too soft or crumbly?
If your irresistible salted caramel apple bars are too soft or crumbly, it usually means they haven’t cooled completely. The caramel needs time to set, and the crust will firm up as it cools. For the best results, I always let mine cool for at least 2-3 hours, or even overnight, before cutting. This ensures clean, firm slices every time, and is a vital step in how to make irresistible salted caramel apples that hold their shape.
Variations of Irresistible Salted Caramel Apple You Can Try
Once you’ve mastered the classic version, I encourage you to get creative with your irresistible salted caramel apple bars! There are so many delicious ways to adapt this recipe to suit different tastes or dietary needs. These variations can turn your baking into truly easy salted caramel apple treats with a twist.
- Nutty Crunch: For an extra layer of texture and flavor, try adding 1/2 cup of chopped pecans or walnuts to the apple filling. The toasted nuts pair wonderfully with the caramel and apples, making these irresistible salted caramel apple bars even more satisfying.
- Gluten-Free Option: You can easily make these bars gluten-free by substituting the all-purpose flour in both the crust and the apple filling with a 1:1 gluten-free baking flour blend. Make sure your breadcrumbs (if you use them) are also gluten-free.
- Chocolate Drizzle: After the bars have cooled, melt some dark or milk chocolate and drizzle it over the top of the caramel layer. The combination of chocolate, caramel, and apple is absolutely divine and makes for truly easy salted caramel apple treats.
- Spice It Up: Experiment with different spices in your apple filling. A pinch of cardamom or a touch of ground ginger can add a unique warmth and complexity to your irresistible salted caramel apple bars.

Irresistible Salted Caramel Apple: 1 Magical Bite
- Total Time: 1 hour 10 minutes
- Yield: 12–16 bars 1x
- Diet: Vegetarian
Description
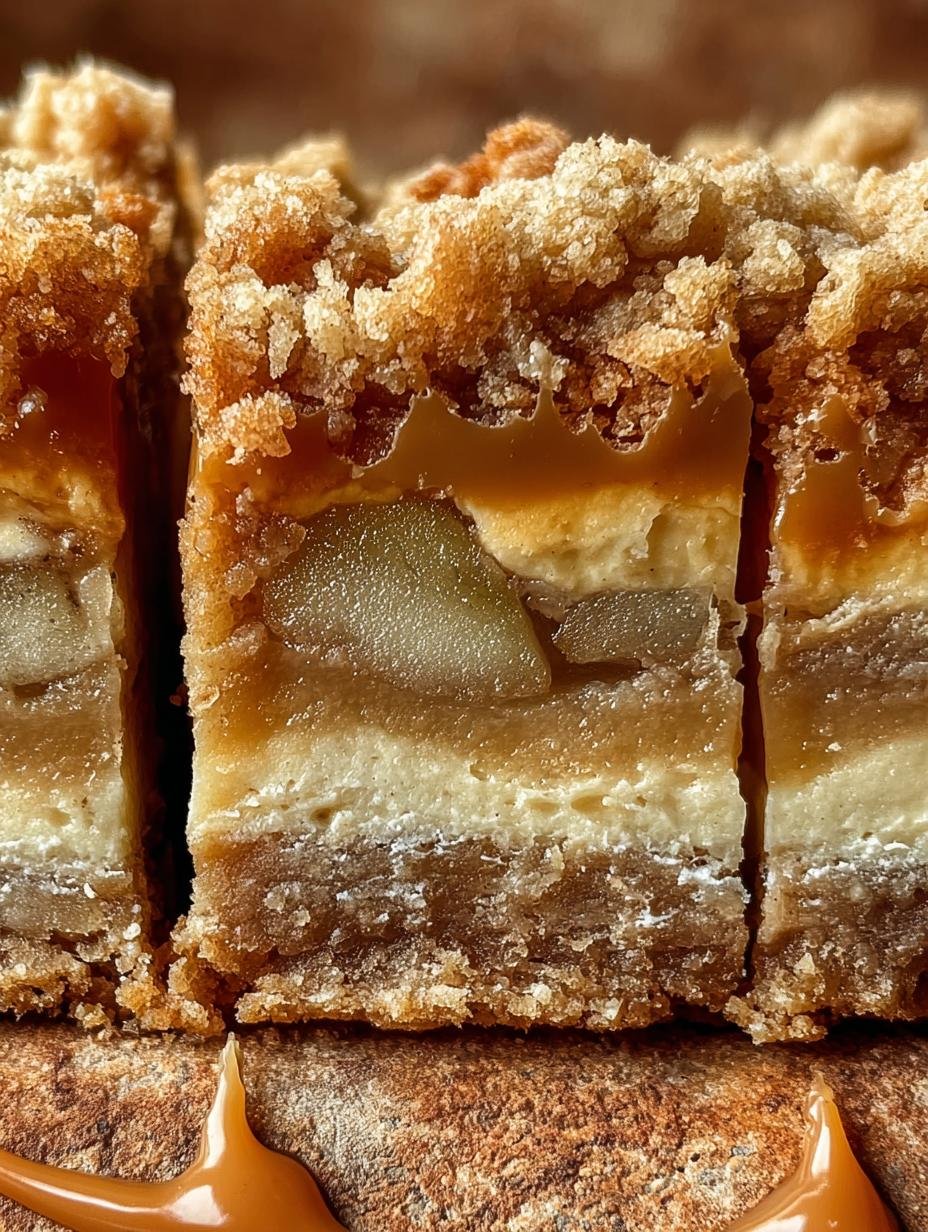
These irresistible Salted Caramel Apple Bars feature a buttery crust, a soft spiced apple filling, and a luscious salted caramel drizzle. They are a delightful fall dessert.
Ingredients
- 1 1/2 cups (190g) all-purpose flour
- 1/2 cup (113g, 1 stick) unsalted butter, cold and cubed
- 1/4 cup (50g) granulated sugar
- 1/4 teaspoon salt
- 3–4 tablespoons ice water
- 4 medium apples (about 500g), peeled and sliced
- 1/4 cup (50g) granulated sugar
- 2 tablespoons (16g) all-purpose flour
- 1 teaspoon ground cinnamon
- 1/4 teaspoon ground nutmeg
- 1 tablespoon lemon juice
- 1 cup (200g) granulated sugar
- 6 tablespoons (85g) unsalted butter
- 1/2 cup (120ml) heavy cream
- 1/2 teaspoon sea salt, or to taste
Instructions
- Make the Crust: In a large bowl, whisk together the flour, sugar, and salt. Cut in the cold, cubed butter until the mixture resembles coarse crumbs. Gradually add the ice water, one tablespoon at a time, mixing until the dough just comes together. Form the dough into a disc, wrap in plastic wrap, and refrigerate for at least 30 minutes.
- Prepare the Apple Filling: In a large bowl, combine the sliced apples, sugar, flour, cinnamon, nutmeg, and lemon juice. Toss to coat evenly. Set aside.
- Make the Salted Caramel: In a medium saucepan over medium heat, melt the sugar, stirring constantly until it is a golden amber color. Remove from heat and carefully whisk in the butter until melted and smooth. Slowly pour in the heavy cream and whisk until smooth. Stir in the sea salt. Let cool slightly before using.
- Assemble the Bars: Preheat your oven to 375°F (190°C). Grease and flour a 9×13 inch baking pan. On a lightly floured surface, roll out the chilled dough into a rectangle slightly larger than the pan. Transfer the dough to the prepared pan and press it into the bottom and up the sides. Prick the bottom of the crust with a fork.
- Add Filling and Caramel: Pour the apple filling evenly over the crust. Drizzle the salted caramel over the apples.
- Bake: Bake for 35-40 minutes, or until the crust is golden brown and the filling is bubbly. Let cool completely before cutting into bars.
Notes
- Choose apples that hold their shape well during baking, such as Honeycrisp, Granny Smith, or Fuji.
- Store cooled bars in an airtight container at room temperature for up to 2 days or in the refrigerator for up to 5 days.
- Reheat individual bars in the microwave for 15-20 seconds or in a preheated oven at 350°F (175°C) for 5-10 minutes.
- You can freeze these salted caramel apple bars for up to 2 months. Wrap them individually in plastic wrap and then place them in a freezer-safe bag. Thaw in the refrigerator before reheating.
- Prep Time: 30 minutes
- Cook Time: 40 minutes
- Category: Dessert
- Method: Baking
- Cuisine: American
Nutrition
- Serving Size: 1 bar
- Calories: 350
- Sugar: 30 g
- Sodium: 200 mg
- Fat: 15 g
- Saturated Fat: 8 g
- Unsaturated Fat: 0 g
- Trans Fat: 0 g
- Carbohydrates: 50 g
- Fiber: 3 g
- Protein: 4 g
- Cholesterol: 40 mg


Leave a Reply