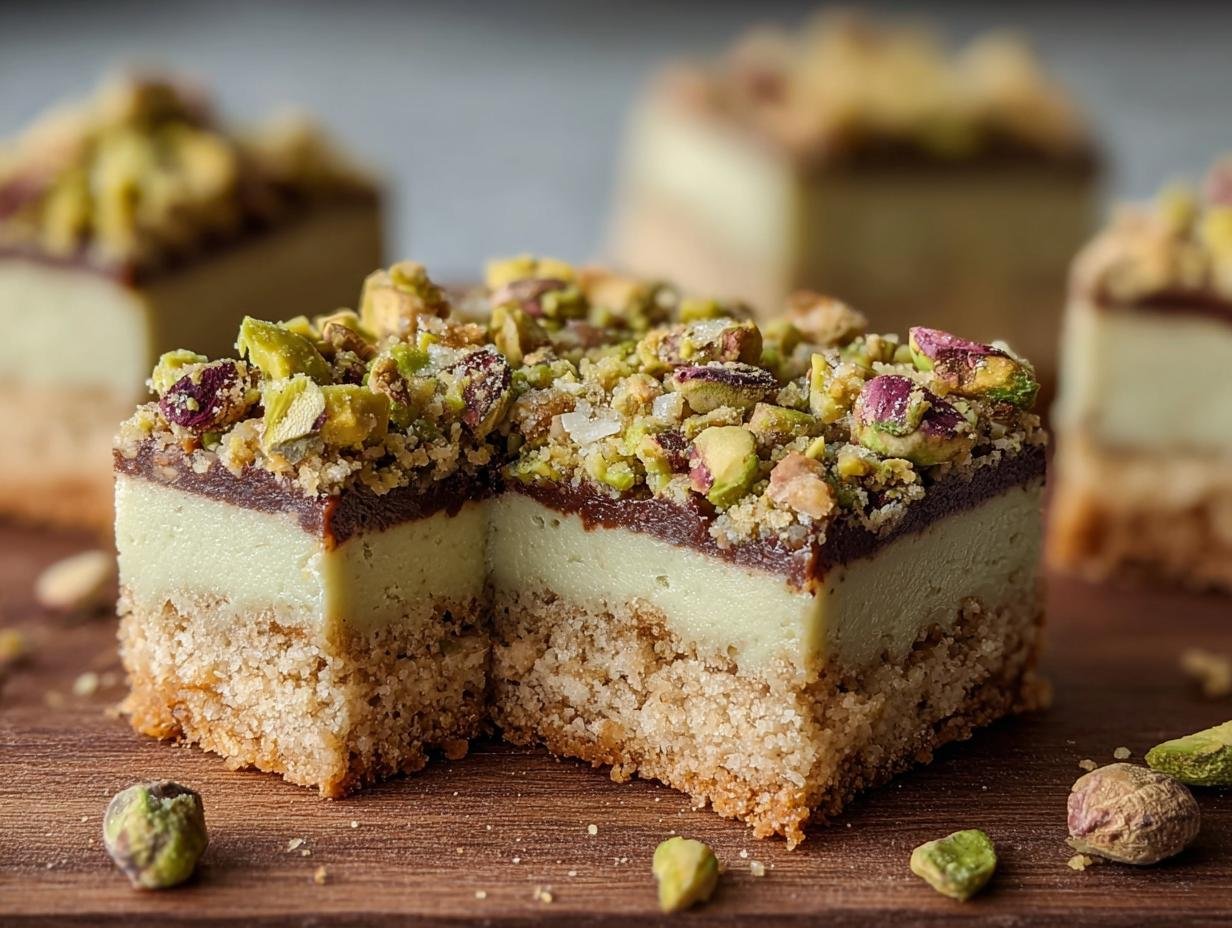
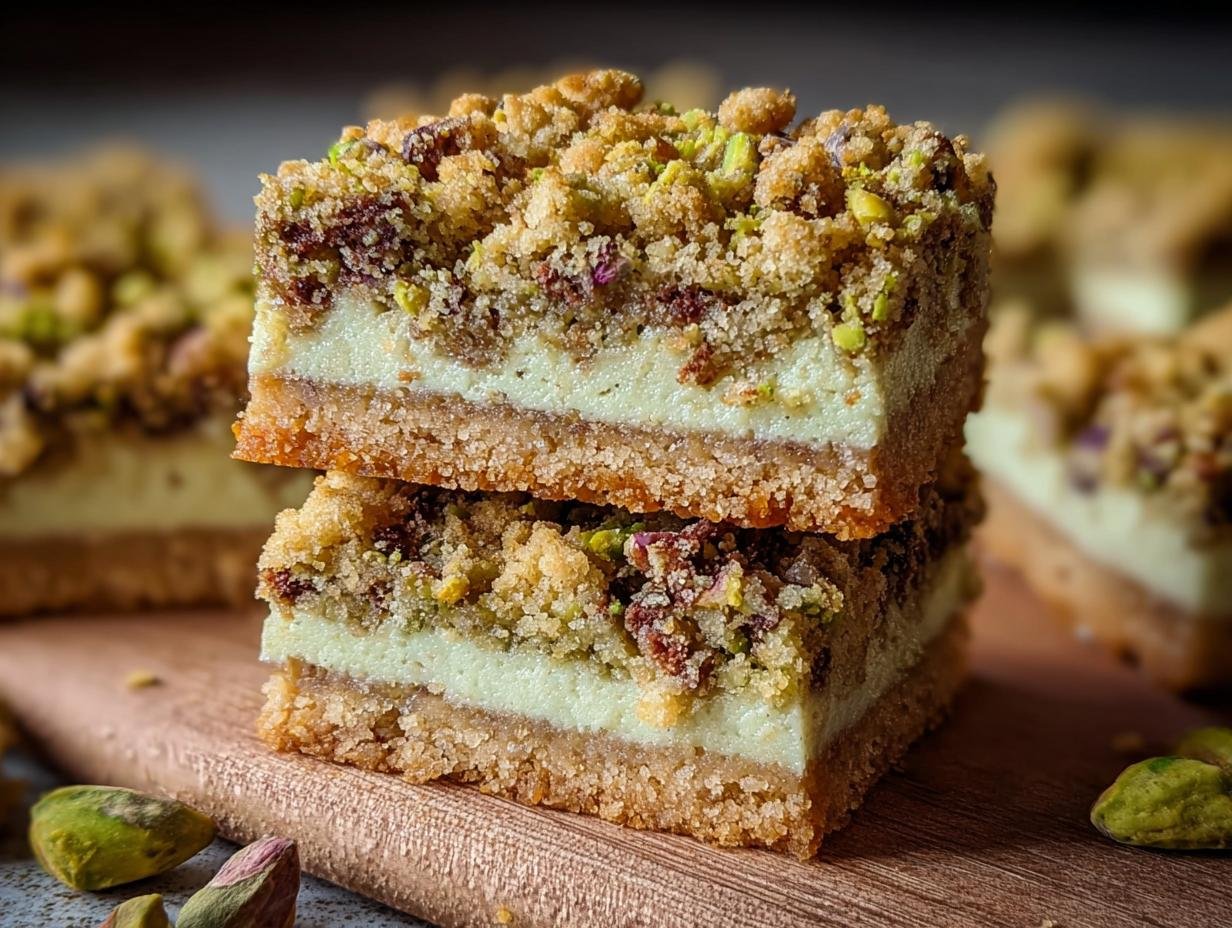
Pistachio Dream Cookie Bars have this magical way of making any day feel a little more special. I remember the first time I tried a homemade batch; it was at a friend’s potluck, and the subtle green hue and the sweet, nutty aroma immediately caught my attention. Each bite was a delightful symphony of buttery shortbread, a smooth, creamy pistachio filling, and a hint of crunch from the chopped nuts on top. These aren’t just any bars; they’re truly dreamy pistachio bars! They have that perfect balance of sweet and nutty that just melts in your mouth. If you’re looking for a dessert that’s both elegant and comforting, you’ve come to the right place. Let’s get baking!
Why You’ll Love These Pistachio Dream Cookie Bars
Get ready to fall in love with these delightful bars. They strike the perfect balance between comforting and special, making them ideal for any occasion. Here’s why they’ll become your new favorite:
- Incredibly easy to make, perfect for beginners.
- The combination of buttery cookie, creamy filling, and crunchy nuts is irresistible.
- These are truly easy pistachio cookie bars that won’t stress you out.
- The subtle, sweet pistachio flavor is wonderfully unique and satisfying.
- They look as beautiful as they taste, with a lovely green hue.
- You’ll be reaching for this as the best pistachio cookie bar recipe you’ve ever tried.
- Perfect for parties, bake sales, or just a sweet afternoon treat.
- They offer a sophisticated yet comforting dessert experience.
Ingredients for Pistachio Dream Cookie Bars
Gathering your ingredients is the first step to creating these delightful bars. You’ll need a few pantry staples and, of course, plenty of pistachios to make this pistachio nut bars recipe shine. Ensuring your butter and cream cheese are properly softened is key for that smooth, creamy texture we’re aiming for.
- 1/2 cup (1 stick) unsalted butter, softened – This creates the tender, buttery base.
- 1/2 cup granulated sugar – For sweetness in the cookie dough.
- 1/4 cup packed light brown sugar – Adds a touch of moisture and depth of flavor.
- 1 large egg – Binds the cookie dough together.
- 1 teaspoon vanilla extract – Enhances all the other flavors.
- 1 1/2 cups all-purpose flour – The structure of our cookie base.
- 1/2 teaspoon baking soda – Helps the bars rise slightly.
- 1/4 teaspoon salt – Balances the sweetness.
- 8 ounces cream cheese, softened – The heart of our creamy, dreamy filling.
- 1/4 cup granulated sugar – Sweetens the cream cheese filling.
- 1 large egg – Helps set the creamy pistachio filling.
- 1/2 teaspoon vanilla extract – Adds another layer of flavor to the filling.
- 1 cup shelled pistachios, finely chopped – The star ingredient, bringing that wonderful nutty flavor and color.
How to Make Pistachio Dream Cookie Bars
Ready to create these dreamy bars? Follow these simple steps to achieve perfectly baked pistachio shortbread bars with nuts. I find it helps to have all my ingredients prepped before I start mixing, especially for the cookie dough.
- Step 1: First things first, preheat your oven to 350°F (175°C). Then, grease and lightly flour a 9×13 inch baking pan. This prevents sticking and ensures your bars come out beautifully.
- Step 2: In a large bowl, get ready to cream together the softened butter, granulated sugar, and light brown sugar. Mix until the mixture is wonderfully light and fluffy – you’ll see it change texture and color.
- Step 3: Beat in the large egg and vanilla extract until everything is well combined. This step really brings the cookie base together.
- Step 4: In a separate, smaller bowl, whisk together the all-purpose flour, baking soda, and salt. This ensures your leavening agents and salt are evenly distributed.
- Step 5: Gradually add the dry ingredients to the wet ingredients, mixing on low speed or with a spatula until just combined. Be careful not to overmix; we want a tender cookie base!
- Step 6: Press about two-thirds of this delicious cookie dough into the prepared baking pan to form an even layer. Set the remaining dough aside for the topping.
- Step 7: Now for the creamy filling! In a medium bowl, beat together the softened cream cheese and granulated sugar until it’s wonderfully smooth and creamy.
- Step 8: Beat in the egg and vanilla extract until everything is nicely incorporated.
- Step 9: Gently fold in the finely chopped pistachios. You’ll start to see that beautiful green hue emerge, signaling the true heart of how to make pistachio dream bars.
- Step 10: Spread this luscious pistachio filling evenly over the cookie base in the pan.
- Step 11: Take the remaining cookie dough and crumble it evenly over the pistachio filling. This creates that delightful contrast in texture.
- Step 12: Bake for 25-30 minutes, or until the edges of the cookie topping are golden brown and the filling looks set. The aroma filling your kitchen will be amazing!
- Step 13: Let these bars cool completely in the pan on a wire rack before cutting into squares. This is crucial for clean slices and the best texture.
Pro Tips for the Best Pistachio Dream Cookie Bars
Want to elevate your bars from good to absolutely unforgettable? I’ve picked up a few tricks over the years that make all the difference in achieving that perfect texture and flavor. Following these simple tips will help you create the most delightful creamy pistachio bar recipe.
- Always use unsalted butter so you can control the saltiness yourself.
- Toasting your pistachios before chopping them intensifies their nutty flavor beautifully. For more on the benefits of nuts, check out this article on pantry staples.
- Ensure your cream cheese and butter are at room temperature for a smooth, lump-free filling and base.
- Don’t overbake! Overbaking is the quickest way to dry out your bars and lose that delightful chewiness.
What’s the secret to perfect Pistachio Dream Cookie Bars?
The real secret to getting that perfect, melt-in-your-mouth texture for these rich pistachio cookie bars lies in the quality of your ingredients and not overworking the dough. Softened butter and cream cheese are non-negotiable for a smooth filling, and gentle mixing ensures a tender cookie base. If you’re interested in learning more about ingredient quality, you might find this piece on food appreciation insightful.
Can I make Pistachio Dream Cookie Bars ahead of time?
Absolutely! These homemade pistachio dream bars are fantastic for making ahead. You can prepare them up to 24 hours in advance and store them, uncut, at room temperature. Just be sure to let them cool completely before covering!
How do I avoid common mistakes with Pistachio Dream Cookie Bars?
A common pitfall for this pistachio crumble bar recipe is overmixing the cookie dough, which can lead to tough bars. Also, resist the urge to cut into them while warm; letting them cool completely ensures clean slices and the best texture.
Best Ways to Serve Pistachio Dream Cookie Bars
These delightful Pistachio Dream Cookie Bars are so versatile, they’re perfect for almost any occasion. For a simple afternoon pick-me-up, I love enjoying one with a cup of hot tea or a glass of cold milk. They’re also fantastic as part of a dessert spread. Consider serving them alongside a scoop of vanilla bean ice cream for an extra decadent treat. If you’re looking for pairing ideas for your next gathering, this pistachio dessert bar recipe works wonderfully with fresh berries or a light fruit salad to balance the richness. They’re a guaranteed crowd-pleaser!
Nutrition Facts for Pistachio Dream Cookie Bars
When you’re enjoying these delightful Pistachio Dream Cookie Bars, it’s helpful to know what you’re getting. These numbers are based on a single serving, giving you a good idea of the nutritional profile of this treat. They offer a lovely balance of flavors and textures.
- Calories: 250
- Fat: 15g
- Saturated Fat: 8g
- Protein: 4g
- Carbohydrates: 25g
- Fiber: 1g
- Sugar: 15g
- Sodium: 120mg
Nutritional values are estimates and may vary based on specific ingredients used.
How to Store and Reheat Pistachio Dream Cookie Bars
Properly storing your Pistachio Dream Cookie Bars ensures they stay delicious for days, maintaining that wonderful texture. Once they’ve completely cooled in the pan (this is super important for clean cuts!), transfer them to an airtight container. For enjoying them within a few days, storing them at room temperature is perfectly fine for up to 3-4 days. If you want to keep these chewy pistachio cookie bars around for longer, your freezer is your best friend! Wrap them well in plastic wrap, then in foil, and they’ll keep beautifully for up to 3 months. For more information on food storage, you can refer to sustainable practices.
When you’re ready to enjoy your frozen bars, simply transfer them to the refrigerator overnight to thaw. If you’re craving them sooner, you can gently reheat them. For a quick warm-up, place a bar on a microwave-safe plate and heat for about 10-15 seconds. They’ll be perfectly soft and delicious, almost like they just came out of the oven!
Variations of Pistachio Dream Cookie Bars You Can Try
While the classic recipe is utterly divine, I love experimenting to see how I can tweak these bars. Sometimes I crave a different flavor profile, or I need to adapt them for dietary needs. Here are a few ways you can put your own spin on these fantastic bars:
- Pistachio Almond Cookie Bars: For an extra layer of nutty complexity, try adding about 1/2 cup of finely chopped almonds along with the pistachios in the filling. This creates a wonderful blend of flavors and textures.
- White Chocolate Pistachio Bars: Stir in about 1/2 cup of white chocolate chips into the cookie dough before pressing it into the pan. The creamy sweetness of the white chocolate pairs beautifully with the pistachio.
- Vegan Pistachio Dream Bars: You can adapt these for a vegan diet by using vegan butter and cream cheese substitutes, and a flax egg (1 tablespoon flaxseed meal mixed with 3 tablespoons water, let sit for 5 minutes) instead of a regular egg.
- Pistachio Fudge Cookie Bars: For a richer, more decadent twist, consider adding a layer of melted dark chocolate or a simple fudge layer between the cookie base and the pistachio filling. This transforms them into something truly special.
Frequently Asked Questions About Pistachio Dream Cookie Bars
What are Pistachio Dream Cookie Bars?
Pistachio Dream Cookie Bars are a delightful dessert featuring a buttery, shortbread-like cookie base topped with a rich, creamy pistachio filling, and often finished with a crumbled cookie topping. They’re a unique and comforting treat that showcases the wonderful flavor of pistachios in a way that’s easy to serve and enjoy. For other delightful desserts, check out our dessert category.
Are these pistachio flavored cookie bars difficult to make?
Not at all! These pistachio flavored cookie bars are designed to be quite straightforward. The recipe involves making a simple cookie dough and a creamy filling, then assembling and baking. Most home bakers find them very approachable, especially with the clear instructions provided. If you’re looking for other easy recipes, consider our easy cinnamon rolls.
Can I use pre-shelled pistachios for these bars?
Yes, you can definitely use pre-shelled pistachios! Just make sure they are unsalted. For the best flavor, I recommend lightly toasting them before finely chopping them. This really brings out their nutty essence and enhances the overall taste of the bars.
How do I ensure the pistachio filling is perfectly creamy?
The key to a perfectly creamy filling is to ensure your cream cheese and egg are at room temperature before you start mixing. This allows them to emulsify smoothly, creating a luscious, lump-free texture. Beating the cream cheese and sugar until completely smooth before adding the egg is also crucial.
Print
Pistachio Dream Cookie Bars: 1 Dreamy Recipe
- Total Time: 50 minutes
- Yield: 12–16 bars 1x
- Diet: Vegetarian
Description
These Pistachio Dream Cookie Bars feature a buttery cookie base topped with a creamy pistachio filling and a crumbly cookie topping, making them a unique and comforting treat.
Ingredients
- Cookie Base:
- 1/2 cup (1 stick) unsalted butter, softened
- 1/2 cup granulated sugar
- 1/4 cup packed light brown sugar
- 1 large egg
- 1 teaspoon vanilla extract
- 1 1/2 cups all-purpose flour
- 1/2 teaspoon baking soda
- 1/4 teaspoon salt
- Pistachio Filling:
- 8 ounces cream cheese, softened
- 1/4 cup granulated sugar
- 1 large egg
- 1/2 teaspoon vanilla extract
- 1 cup shelled pistachios, finely chopped
Instructions
- Preheat oven to 350°F (175°C). Grease and lightly flour a 9×13 inch baking pan.
- In a large bowl, cream together softened butter, granulated sugar, and brown sugar until light and fluffy.
- Beat in the egg and vanilla extract until well combined.
- In a separate bowl, whisk together flour, baking soda, and salt.
- Gradually add the dry ingredients to the wet ingredients, mixing until just combined. Do not overmix.
- Press about two-thirds of the cookie dough into the prepared baking pan to form an even layer. Set aside the remaining dough.
- In a medium bowl, beat together softened cream cheese and granulated sugar until smooth and creamy.
- Beat in the egg and vanilla extract until well combined.
- Gently fold in the chopped pistachios.
- Spread the pistachio filling evenly over the cookie base.
- Crumble the remaining cookie dough over the pistachio filling.
- Bake for 25-30 minutes, or until the edges are golden brown and the filling is set.
- Let cool completely in the pan before cutting into bars.
Notes
- Toast the pistachios lightly before chopping for a more intense flavor.
- Ensure butter and cream cheese are softened for smooth consistency.
- Do not overmix the cookie dough to avoid tough bars.
- Cool bars completely before cutting for clean slices.
- Can be made ahead and stored in an airtight container.
- For longer storage, freeze for up to 2 months.
- Prep Time: 20 minutes
- Cook Time: 30 minutes
- Category: Dessert
- Method: Baking
- Cuisine: American
Nutrition
- Serving Size: 1 bar
- Calories: 250
- Sugar: 15g
- Sodium: 120mg
- Fat: 15g
- Saturated Fat: 8g
- Unsaturated Fat: 0g
- Trans Fat: 0g
- Carbohydrates: 25g
- Fiber: 1g
- Protein: 4g
- Cholesterol: 30mg


Leave a Reply